Friday, June 29, 2012

Fabric Shopping Tip

If you've ever purchased your own fabric for curtains you know the time and patience it takes to walk up and down the fabric store aisles!  You go into the store with one idea in your mind and then see things you might not have thought of so now you are overwhelmed with the possibilities!  Not to mention you're in a store surrounded by colors that aren't in the room you're planning to make curtains for and let's not even discuss the terrible lighting!
Photo Credit
For me, the toughest part is picturing what the fabric will look like gathered as a curtain.  In the store the material is "flat" but we rarely hang our curtains in a perfect flat line.  The large bolts are easy to unroll and gather yourself to get a visual but those little square samples in the special order section are not as easy!  


While shopping with my Mom the other day we wanted to compare three fabric options for her dining room windows.  The curtains are almost always open so we needed to be able to visualize how the pattern would actually look scrunched up.  I quickly took advantage of those annoying hangers the samples hang on and pleated the curtains up...now we could see and compare how they would each look. 


I would always shy away from these little sampled because I couldn't picture how it would look, but now with this trick I might just give them a second chance!  Unfortunately, neither of us were in "love" with any of these options so we are actually still on the hunt for her perfect dining room curtains! 

We have just a few more days till the end of our Patriotic Link-Up Party!  Take a minute to pop over and see all the great links...there's so many awesome ideas I'm having trouble picking a recipe to use for July 4th!  Also remember to share your Patriotic posts! 


Wednesday, June 27, 2012

Blueberry Scones

Proper British Scones With a Pop of Blueberry!


I absolutely love scones!  When I am in the UK it is my number one treat! There is nothing better than stopping in a little cafe for tea and scones - delicious!! In fact some of my best travel memories are from sitting in little cafes just taking in the sites (and people)!

I have been searching for a good authentic recipe and finally found one...but you know how I am, I always have to tweak it! ;)  The original recipe is from Nicky at delicious days. Be sure to check out her blog, she has great recipes and it's fun to read! I really didn't tweak too much, the main change was using fresh blueberries instead of dried fruit like sultanas.  


I think the neatest thing about this recipe is that you combine all the ingredients in a food processor! It is super quick and easy as well! 

Ingredients (yields 10 smallish scones)


1 2/3C all-purpose flour, plus more for handling the dough
1,5 tsp baking powder
2 tbsp white sugar
1/2 tsp fine sea salt
4 Tbsp cold butter
5 oz half & half
1/4C blueberries (or other dried fruits)


For brushing: 1 egg yolk and 1 tbsp 1/2 & 1/2


First combine all your dry ingredients and blend with the food processor.  


Next add in your chilled butter cut into small squares.  Pulse the food processor a few times until the butter is no larger than a tiny pea.  Once that is completed add the half and half.   


Turn the food processor on until the dough forms a ball (or oval in my case!).  


Place the dough on a well floured surface and knead.  DO NOT overknead - if you do the scones will be tough instead of flaky! 


After I flattened the dough I pressed the blueberries into the top.  I later realized I could have just kneaded the berries in during the previous step.  (My initial fear was I'd burst the berries all over the kitchen, but they were tougher than I thought!)


You can use any type of cutter to cut the round scones out of your dough.  Growing my my grandmother always used a glass to cut round things (primarily pierogies!); my glasses all seemed too big so I decided to use a mason far - it was the perfect size!


This was my first time using my silicone spill mat (Thanks Mom!).  I simply placed it on a cookie sheet then laid the scones out.  (They don't spread when they bake so you don't have to worry about spacing!)
Before you place them in the oven be sure to brush them with the egg yolk mixture.


The house smelled amazing while these little British treats were baking!  Sanka & were both anxious for the timer to go off, but it was well worth the wait!  


They came out beautiful - I love the color!


Traditionally these would be served with clotted cream and jam, but to be a tad healthier I ate mine plain!  I didn't miss the extras at all!  It was so yummy and the baked blueberries were like their own little jam!


Monday, June 25, 2012

Patriotic Link-Up Party Featured Post

It's time again for me to pick a favorite post from our Patriotic Link-up Party!  This is a tough task...we've had so many awesome bloggers share their recipes, projects and even their ways of honoring our soldiers and country!


Since I featured a project last time, I thought I'd choose a recipe for this feature.  I've chosen Sugarkissed's Patriotic Apple Pie Pockets!  What's more American than apple pie in the shape of stars?

Patriotic Apple Pie Pockets
Sugarkissed's Patriotic Apple Pie Pockets

I think I'll be making these for our July 4th picnic this year!  They are just so cute and festive...not to mention I bet they taste amazing!! 

Be sure to check out Sugarkissed's blog and all her other great recipes!  Also hop over to suzyhomemaker's blog to see who she has chosen to feature from our Patriotic Link-up Party

Friday, June 22, 2012

Sewing Lessons

I few weeks ago I shared our boat parking pad project, but that wasn't the only project associated with our special purchase!  Since we bought a used boat it of course needed some tender loving care.  I have left the engine and electrical stuff up to my other half but I have tackled the upholstery.  There are moments where I stop and wonder what am I thinking?? But then I persevere and conquer yet another sewing challenge!

I have learned tons about sewing (and myself) through this project.  I'm over half way done with the sewing so I thought I'd share a few of the things I've learned.

First let me share the semi-end project.  This is a completed seat, but it is not stapled down to the cushion yet so it looks a bit lumpy...but you get the idea!


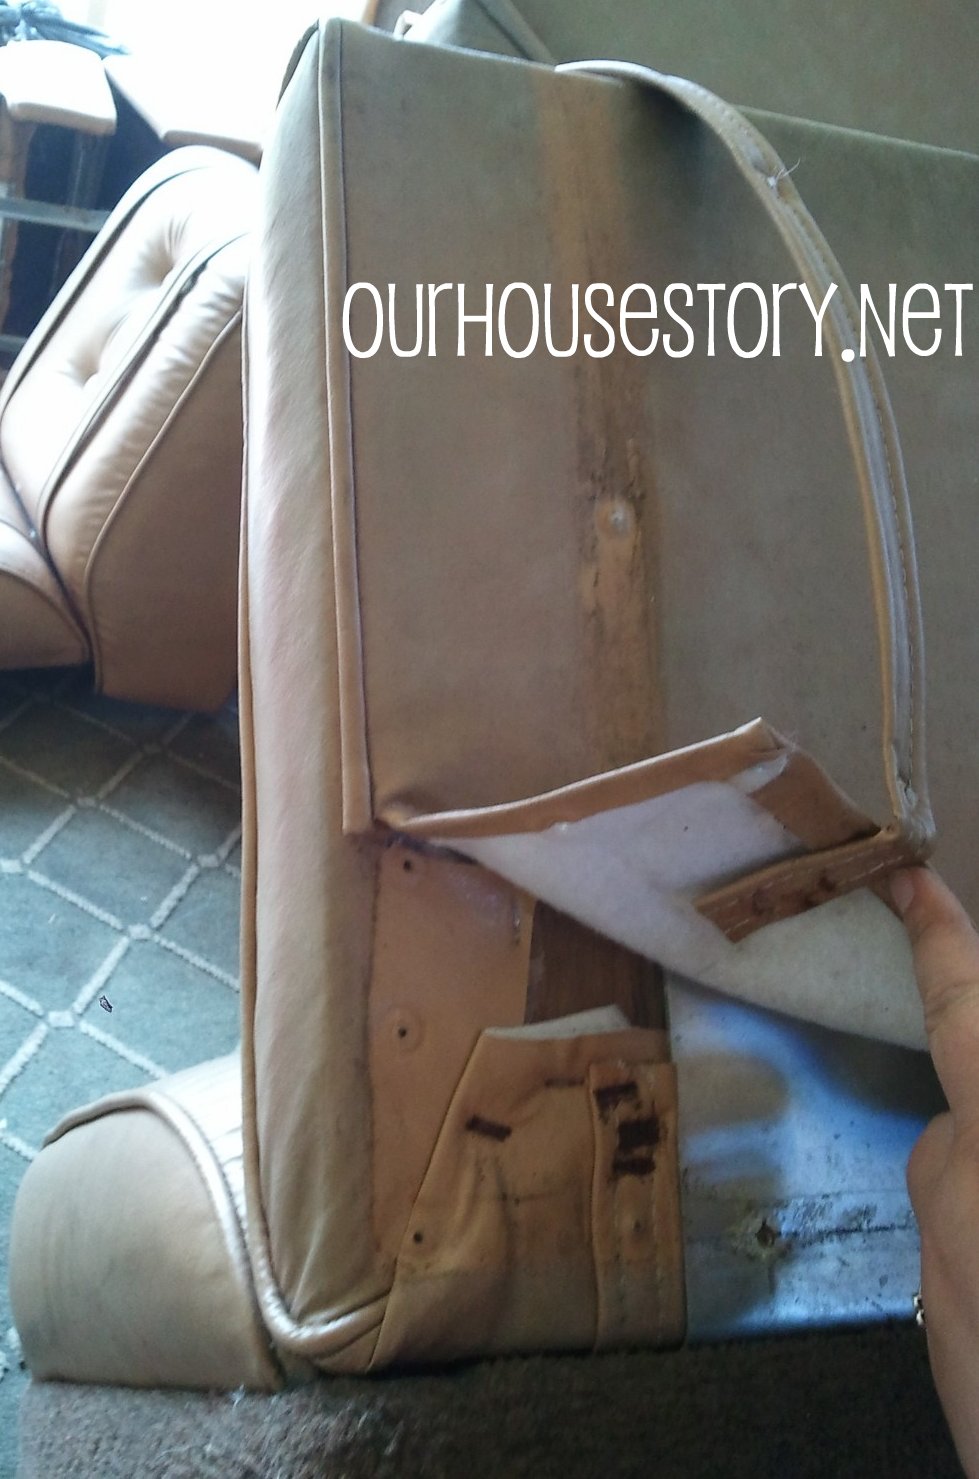
Removing the old upholstery was an overwhelming task but as you can see it was worn and had some mildew.  Once everything was taken out of the boat I realized just how much there was to be done.  (And this isn't even all of it!) 


I wish I had some tips on removing the old upholstery...I suppose the number one thing I learned is to use stainless steel staples.  The previous upholsterer did not!  The staples were rusty and very hard to get out!  (I'm sure I should have had a tetanus shot before starting this project!)


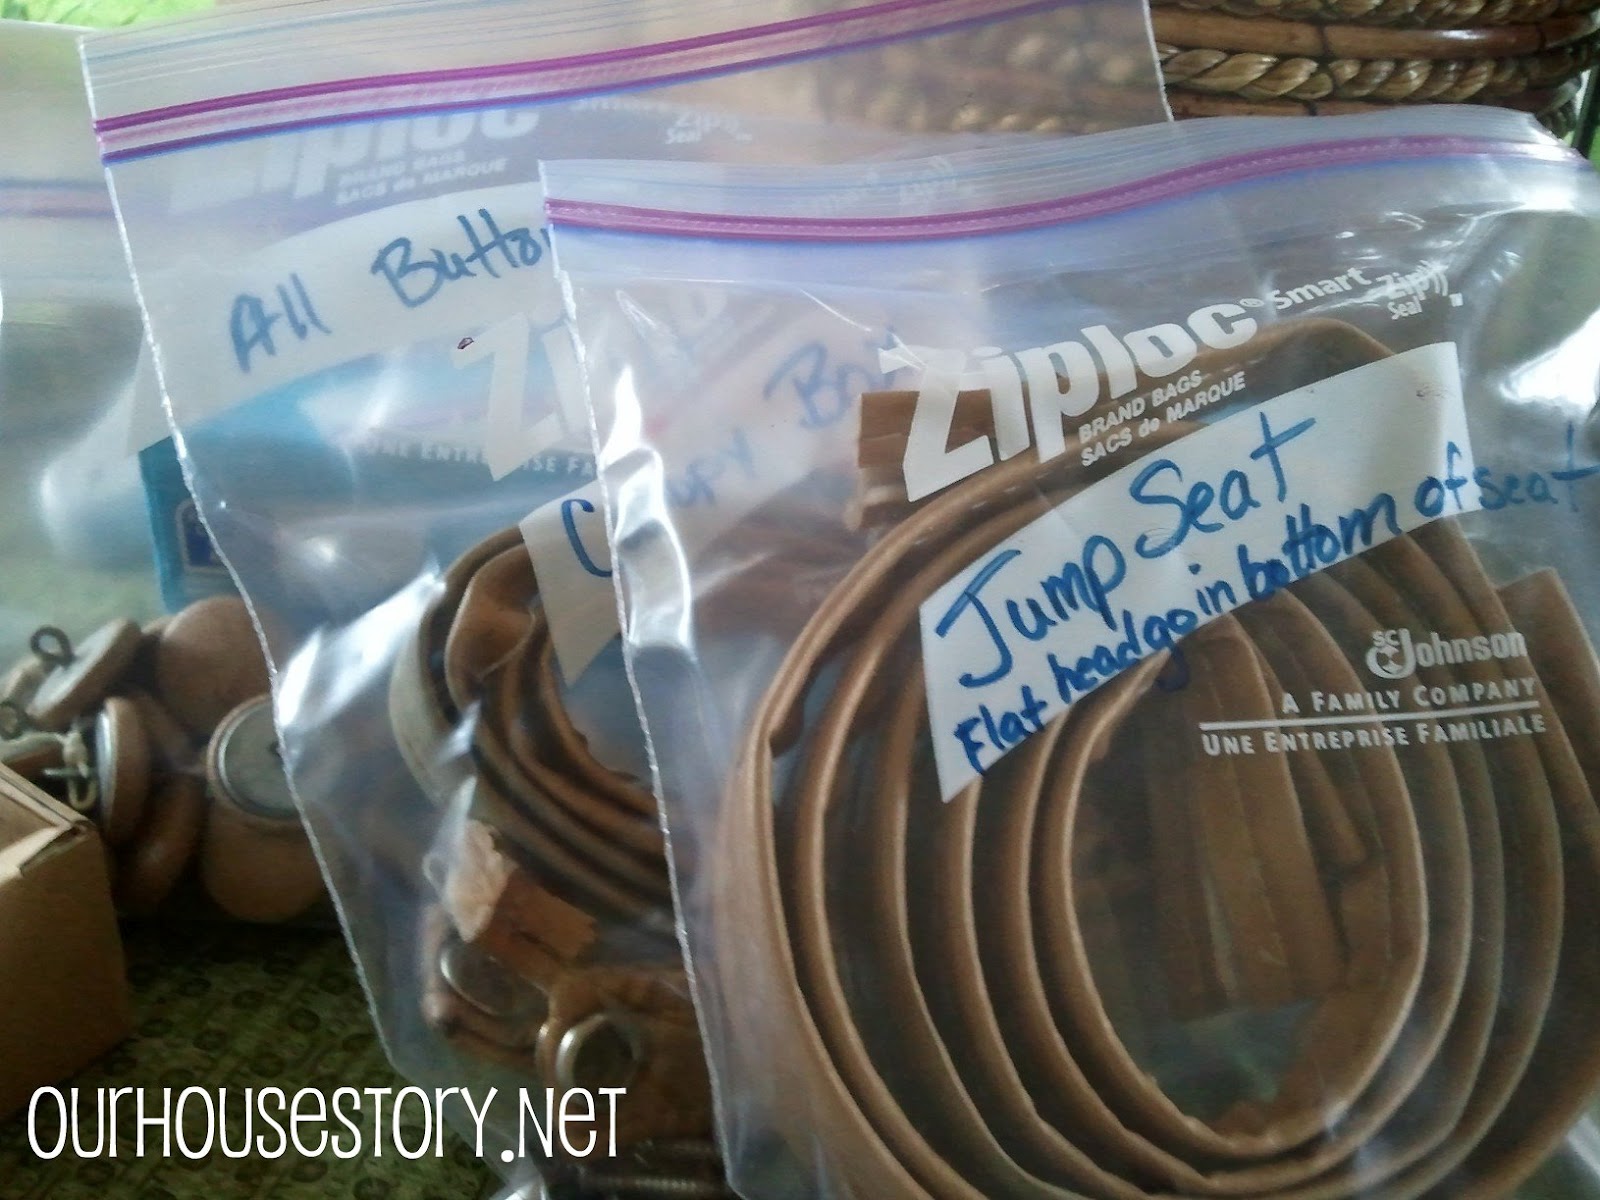
As I took the seats apart they had a variety of screws and hinges so I quickly realized how important it was to be organized.  Easy tip....use a ziploc bag!!  I used a different bag for each different type of seat or cushion, making sure I labeled it clearly! I can't imagine how we'd ever get it all back together if I hadn't kept the parts separate.  


In addition to the vinyl having mildew the cushions underneath had gotten wet and not aired out properly.  I feared we'd have to replace the cushions; which would have been a pretty penny, but with a good cleaning with Odoban they smell fresh and mildew free! (I don't usually endorse products, but I am a huge fan of Odoban.)  It took a long time for the cushions to dry out but I was so pleased with the result!  I could stick my nose right into the foam!!  I am always quick to toss things out and buy new but I have learned don't just toss those cushions, blankets etc that get mildew or mold...give them a good bath and they will be back to their fresh selves! 


We decided we really wanted to have some piping on the seats.  I struggled with the piping (at first) because you have to sew very close to it but not over it!  This is fine when you can see the piping, but when sewing the second layer it is impossible to see exactly where to sew...unless...you use a ZIPPER foot!!!
Once I discovered the zipper foot I thought I had found gold!! 


The only drawback with the zipper foot is that it doesn't help feed the thick fabric through, so I've had to 
use a bit of muscle!  Anytime you need to see where you're sewing I highly recommend the zipper foot!

The most important lesson I've learned so far in this project is not to doubt my abilities!  If you take the time to think through what you're doing and measure multiple times your not going to run into many problems.  If you make a mistake, you can rip it out and start over...I learned that very early on!  Nobody will know how many times you started over, but they will know if you give up and quit!


Wednesday, June 20, 2012

Burlap Star Wreath

I needed to take my Spring door decoration down since we're quickly approaching the summer solstice!  I decided to create something a bit patriotic using a variety of materials.


I recycled the burlap wreath I used for Valentine's Day, some red raffia and material used to make American flags that I had picked up at a local farmer's market.  (The fabric is not from an actual flag, it is rejected fabric that could not be used to make a flag.)


I started by wrapping the raffia around the burlap wreath.  I didn't want to glue it onto the wreath so that I could continue using the burlap wreath for different holidays.  I was able to tie a knot and the raffia stayed in place.

I cut the stars out of the fabric in a circle shape.  I did this free hand since I didn't want it to be perfect looking.  Then I glued the stars on - one star on each "stripe" of raffia.


I used a scrap piece of burlap to make a strap for hanging and hung the wreath in its new home!


This project was so quick and I'm really pleased with how the mix of materials work together!  In less than half an hour I had the wreath hung on the door!  I love quick projects that turn out so cute!


Be sure to check out all the other patriotic projects and recipes at my Patriotic Link-Up Party!  Join in the fun and link up your posts as well!


Check out where I'm linking up on the party list to the right! 

Monday, June 18, 2012

Quick Sprouts Side Dish

I recently shared my love for farmer's markets here.  During that trip I got a load of brussel sprouts!  I was planning to freeze some, but I just can't stop eating them!  

My favorite way to eat them is super simple and quick!

Quick Sprouts

After cutting the ends off the sprouts I place them in a microwavable bowl with a little olive oil.  Roll them around so they are well coated.  Then I sprinkle some Sazondor Total and Parmesan Cheese and roll them around again.  

Quick Sprouts

Pop the bowl in the microwave.  For one serving I microwaved for 3 minutes, but it will really depend on your microwave's power.

Serve as a side dish or even a little snack!  I had mine along side Mango Coconut Chicken! 

Quick Sprouts & Mango Coconut Chops


Friday, June 15, 2012

High Five Friday

Happy Friday!
I'm hooking up with Lauren from My Grey Desk today for her High Five for Friday party!

Photobucket

This week started off with a very special event then the rest of the week was full of personal achievements...those always feel good don't they?


1

My first high for this week is truly my #1 high for the week!  This past weekend we attended one of the most beautiful weddings I've ever been to!  From the location to the people it was just amazing!  To top it off I don't know any two people how are as much in love as these two!  It was a very fun and special day! Congrats to two of the most beautiful people I know!
Isn't this a beautiful setting for a wedding?  The reception was in the open air barn! 

2

My boat re-upholstery project is coming along!  I have finally figured out the correct settings on my machine and I have embraced the zipper foot!  There were moments when I was ready to give up, but I didn't!  I'm glad I pushed myself and won the sewing machine battle!

3

My carrots and chives are sprouting!  I've never planted anything from a seed before so I am very excited!!

4

I had the opportunity to do a photoshoot for a friend this week.  I was quickly reminded of how much I enjoy photography - especially of children!  I absolutely love capturing them in natural moments.  

I thought about sharing a photo from the shoot, but I am paranoid about my images being stolen...I wish we didn't have to worry about that, but we all know the reality of "image stealing." 


5

The lightening bugs have been coming out at night - I love them...I don't know what it is about them, but they just make me smile!  However, I have never laughed about lightening bugs till tonight when the dog came in from outside with one stuck in the fur of her ear.  We kept the lights off so it kept blinking, yet the dog had no idea why we were laughing at her!  It was definitely one of those moments where you're reminded that the little things in life can really make you laugh and enjoy the world around you! (Sorry we couldn't get a picture...but imagine this cute face with a flashing bug on top of her head!) 


I hope everyone had a wonderful week!  


Wednesday, June 13, 2012

Star Muffins

During a trip to Hobby Lobby a few weeks ago I picked up some super cute cupcake liners for the patriotic season.  I am not that big of a fan of cupcakes though, we much prefer muffins!  I try to make the muffins as healthy as possible so i'm always looking for good recipes.

This time I had bananas and apples that needed to be used up.  I'm so glad I did because that led me to finding a great new muffin recipe!


I adapted the recipe slightly but if you're interested the original recipe can be found here.

Star Muffins

Ingredients:

1 C whole wheat flour
1/2 tsp baking soda
1/2 tsp salt
1 tsp pumpkin pie spice

6Tbsp coconut oil
1/3 C agave syrup
1 tsp vanilla extract
2 mashed bananas
1 apple - cored and diced

Optional Frosting
2 oz cream cheese softened
2 Tbsp agave syrup

Mix all the dry ingredients.
Add the oil, syrup, vanilla and mashed banana.  
Beat until the mixture is smooth.  Stir in the apple.  

Fill your muffin tin or liners and bake at 350° for 20-25 minutes.  


While the muffins are cooling prepare the optional frosting. 


 Once the muffins are completely cool, add the cream cheese frosting and enjoy!
I added some red sugar to the frosting hoping it would make it red, but instead it's a bit pink.  I just sprinkled the red sugar then to at least get a bit of red on the tops!  


These were great for breakfast!  
We actually think there's no need for the frosting they are packed with flavor and sweetness without the frosting! 

I've added these Star Muffins to the Patriotic Link-Up Party I'm doing with suzyhomemaker!  
Be sure to stop by and check out all the link-ups! 


Monday, June 11, 2012

Mayo Free Avocado Macaroni Salad

Have you ever created a recipe that you just couldn't wait to share?  This is one of those!

I absolutely love macaroni and/or potato salad, but I know they are not healthiest choices, so I don't make them often...that was until I saw avocado mayo on Pinterest!  At first I thought oh that's a neat idea...then it hit me!!!!  I can make a macaroni salad using avocado may...and so I did!

Avocado Macaroni Salad


Mayo Free Avocado Macaroni Salad

Ingredients

1/3 C + 1 Tbsp Avocado Mayo
1 carrot
1 yellow pepper (any color)
3 scallions
3 stalks celery
1/4 box elbow macaroni - prepared and chilled
1-2 tsp mustard powder
shake of paprika

(Be sure to have your elbow macaroni prepared and chilled before putting all the ingredients together.  I made my macaroni in the morning so it would be chilled by lunch.)

First prepare the avocado mayo.  I used a recipe from Rachel at The Traveling Spoon.  This was so simple.  I used my food processor and it just whipped right up into a creamy mayo substitute! 


I used a Bell Freezer Jar since I was planning to freeze what I didn't need.  

Avocado Mayo

Next throw all your vegetables into the food processor - no need to rinse the "bowl," 


I love recipes that I can use one dish to prepare! 


Now is when it all comes together.  Mix the avocado mayo, vegetables and macaroni together.  I started with 1/3C of the avocado mayo but then thought it needed a little bit more.  I would recommend starting with 1/3C, then adding more depending on how you like your macaroni salad.  Add the mustard powder...this again, is based on your flavor preference.  


Shake a little paprika on top and serve! It was amazing!  I was hoping it would be good, but it was better than I could have imagined! 

Avocado Macaroni Salad

Has anyone tried making potato salad with avocado mayo? 


Don't forget to check out the Patriotic Link-up Party!  
Some wonderful bloggers have already shared their ways of honoring soldiers and our Nation!  
I can't wait to see what you have to share! 


Check out who I'm linking up with on the sidebar! 

Friday, June 8, 2012

Guinea Pig Bed

For those of you who do not have guinea pigs or other small pets you might think I'm a little crazy...and that's okay, I don't mind!  My piggies love to cuddle and the beds sold in pet stores are expensive for how simple they are!  I recently purchased some fleece at a fabric warehouse with this specific project in mind!

guinea pig bed


I did some research online to see how others have done this and realized just how simple it is.  (This is a good tutorial.)  This project could be adapted to any size, you could even make it for a cat.  In fact I didn't even measure...oh, maybe at one point I did, but I'll get to that!

I started off by deciding how big I wanted the bed to be.  Since my piggies like to cuddle with each other I wanted it to be a little on the big side and an oval instead of a circle.  


Keep in mind that your initial shape will get smaller once you start sewing - remember seam allowance!
Once I had this shape I made another one out of fleece and I cut a piece of batting.
Then it was onto the sides.  Here's where the quick measuring came in.  I measured the length and width, then doubled each, added them together and had the length my edges needed to be.


I cut the edge pieces about 5" wide.  (Upon completion of the project I'd suggest going smaller!)
Once I had everything cut it was time to sew!


There are neater ways to do this but I simple sewed the bottom pieces together, then the sides and then attached the sides to the bottom.  Next time I make one I will allow more time and take a few extra steps to sew the pieces together in a neater fashion.

guinea pig bed


The piggies were happy right away, checking out their new bed, especially Cheeky!

guinea pig bed

As I mentioned earlier though I will make shorter sides next time...after a few hours they folded the sides down and seem to think it's a dining room!

guinea pigs

I have tons of fleece so I will be perfecting this bed.  I might even try making fleece tunnels for them...

Check out who I'm linking up with on the sidebar! 


Related Posts Plugin for WordPress, Blogger...